Domestika – Introduction to 3D Vehicle Modeling
 2022-09-29

 1 739
1 739
 0
0
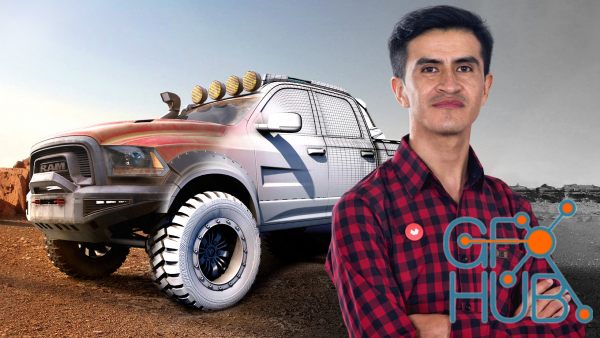
Download video course by Domestika – Introduction to 3D Vehicle Modeling. Learn how to model, texture and render your first car with Maya, Substance Painter and Keyshot.
If you are passionate about vehicles, not only for their horsepower but for their design, in this course you will enjoy learning to model a 3D car from scratch, from the hand of a professional like Alber Silva. 3D artist specialized in modeling vehicles and machinery, Alber lives from his passion for car design. He works in the area of VR Assets for WebCreek, where he has carried out virtual reality projects for Maersk, and also, modeling for Moving Message Co. and his client, Volkswagen.
In this course you will learn to model a car step by step with Autodesk Maya, Substance Painter, Keyshot and Adobe Photoshop. First you will define the project, you will look for reference images, you will learn techniques of modeling, optimization, UV cuts, texturing and exporting maps, to finally import and render your car with the highest level of detail.
The first thing you will do is meet Alber Silva, who will tell you about his career and how he came to the world of 3D simulation. You will see its main influences, from automotive brands to artists specialized in Hard Surface , textured or modeled cars, among others.
You will start by knowing the three types of scenarios in which you can perform the modeling of a car, with which you can better define the focus of your modeling project whether it is for rendering , video games or augmented reality.
With Alber, you will carry out a general review of the Autodesk Maya interface, one of the 3D production software most used by different industries. You will learn to scroll through a project, move the camera and edit shapes. Then, you will look for photographic references of every detail of the vehicle you want to work to model it accurately.
You will start the modeling by the hood, which will facilitate the work to accommodate the polygons of the mesh, and you will continue creating the rest of the components: sides, fenders, doors, windows, roof, tires, front and rear headlights, additional accessories and some modeling details to leave it ready.
Once the modeling stage is finished, you will review each piece created, renaming them with Outliner and softening its vertices. Then, you will make the UV's cuts and organize each piece cut with the Layout tool manually.
You will review the main functionalities and interface of Substance Painter, and then import and texturize your model using the available libraries.
Then, you will make a simple render with which you will know the Keyshot functionalities, importing an element of the scene. Thus, you will know the interface and tools of this render engine. Then you can configure the lighting, camera and blackplate to render .
Finally, with the render you will do a postproduction work to correct the color, lights and shadows in Adobe Photoshop.
52 lessons (9h 37m)
Download links:


Comments
Add comment
Tags
Archive
| « July 2026 » | ||||||
|---|---|---|---|---|---|---|
| Mon | Tue | Wed | Thu | Fri | Sat | Sun |
| 1 | 2 | 3 | 4 | 5 | ||
| 6 | 7 | 8 | 9 | 10 | 11 | 12 |
| 13 | 14 | 15 | 16 | 17 | 18 | 19 |
| 20 | 21 | 22 | 23 | 24 | 25 | 26 |
| 27 | 28 | 29 | 30 | 31 | ||
Vote

New Daz3D, Poser stuff

New Books, Magazines