Udemy – Blender – Tesla Cybertruck Forge
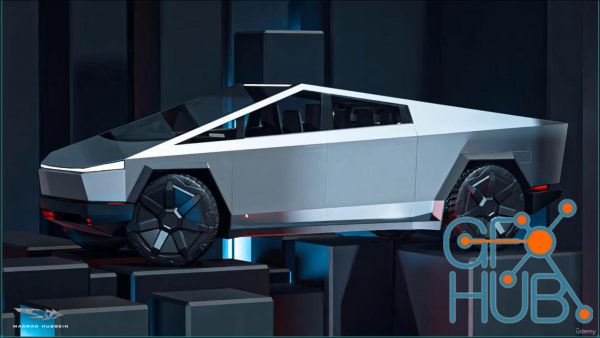
Tesla Cybertruck creation from start to finish with Marwan Hussein
What you’ll learn
Learn how to setup the scene and add the blueprints images using easy method
Learn how to use Blender modeling tools to model the truck without any plugin from outside
Learn how to get clean nice modeling results by fixing any shading issues
Learn how to use Shrinkwrap modifier as modeling technique to get clean sharp geometry looking
Learn how to use displace modefier to create the tire tread, very nice and quick method to create complex tire tread for your car
Learn how to use armature to rig the truck we will create the most important controllers to control the truck
Learn how to create constraint for the bones to rig the truck in efficient accurate way
We will give each bone a specific shape to make the rig looks clean and understandable
Learn how to use shader editor to create realistic materials to the truck from start to finish
Learn how to create simple environment for the truck as a background, we will create 2 environments
Learn how to use cycles to render the scene and get realistic render results
Learn how to use Eevee to render the truck
Learn how to make post-processing for the final render
Requirements
Download Blender and get yourself familiar with interface and how to move objects
Description
Hello everyone, I’m Marwan Hussein, I’m a 3D artist I have been in the 3D field for 10 years now.
I love to create cars I find that fun for me, and I love to share my knowledge with people that like to learn some cool stuff in Blender.
In this course I decided to create Tesla Cybertruck from start to finish, I like the idea of this truck it comes with a new idea that makes the Tesla Cybertruck stand out from the rest of the trucks around the world.
In this course we will learn how to model the truck from start to finish, the modeling section was challenging because there are too many details and I tried as much as I could to add all the details ( the exterior details ) to make the truck looks realistic.
In my nature, I like to care about details, but caring about details comes with its cost, it makes the course a little bit longer, especially the modeling section, but that’s not bad because if you do modeling a lot you will master the modeling eventually because of that modeling section take a big portion of the cake.
In the modeling section, we will learn a lot, new technics help to speed your workflow, fixing a surface problem when we get bad surface shading, learning new ways to achieve complicated geometry, learning new shortcuts new modifiers new skills, etc……
When the modeling section is finished we will rig the truck, rigging is a very fun part, I like when I create a car and have the ability to animate it as I want, because of that learning how to use armature inside Blender is something very important, anyway, we will learn how to rig the front and the back tire group, we will learn how to open and closed the back cover door of the truck.
We will learn how to give the bones specific shapes so we can understand them in case we want to animate the truck or send it to an animator.
The materials section is fun as well, in this section we will learn how to use the shader editor and how to create our materials from start to finish step by step, there is a lot of stuff there I don’t want to get into details but I’m sure you will find it useful and fun.
Rendering section, first we will use Cycles to render the truck and we will learn how to create an environment to put the truck inside it, we will create 2 environments you can see in the intro video.
After using Cycles we will use Eevee as well, and we will try to get nice beautiful realistic render results with Eevee, not just that, we will switch to the compositor to add the final touch, it is called post-processing.
I divided the course into sections, each section I give a name, for example, the Modeling section, Materials section, Rigging section, etc…
I will add a section for the project folder, before you start you should download the project folder, and I will add 2 Blueprints, you can download them both.
I will add the Blueprints that I used in the course and a Blueprints of the final result of the course, you have the choice to decide what you want to use, but as advice I advise you to use the Blueprints 2 because it will be 100% accurate as compared with the first one,
you will find all of that in the project folder section.
Who this course is for:
This course for student want to learn how to create and rig cars
This course is for the student who wants to create 3D models and sell them and make some money.
This course is for students who want to develop their knowledge in Blender to learn something new
Download links:
Blender - Tesla Cybertruck Forge.part01.rar
Blender - Tesla Cybertruck Forge.part02.rar
Blender - Tesla Cybertruck Forge.part03.rar
Blender - Tesla Cybertruck Forge.part04.rar
Blender - Tesla Cybertruck Forge.part05.rar
Blender - Tesla Cybertruck Forge.part06.rar
Blender - Tesla Cybertruck Forge.part07.rar
Blender - Tesla Cybertruck Forge.part08.rar
Blender - Tesla Cybertruck Forge.part09.rar
Blender - Tesla Cybertruck Forge.part10.rar
Blender - Tesla Cybertruck Forge.part11.rar
Blender_-_Tesla_Cybertruck_Forge.part01.rar - 1.9 GB
Blender_-_Tesla_Cybertruck_Forge.part02.rar - 1.9 GB
Blender_-_Tesla_Cybertruck_Forge.part03.rar - 1.9 GB
Blender_-_Tesla_Cybertruck_Forge.part04.rar - 1.9 GB
Blender_-_Tesla_Cybertruck_Forge.part05.rar - 1.9 GB
Blender_-_Tesla_Cybertruck_Forge.part06.rar - 1.9 GB
Blender_-_Tesla_Cybertruck_Forge.part07.rar - 1.9 GB
Blender_-_Tesla_Cybertruck_Forge.part08.rar - 1.9 GB
Blender_-_Tesla_Cybertruck_Forge.part09.rar - 1.9 GB
Blender_-_Tesla_Cybertruck_Forge.part10.rar - 1.9 GB
Blender_-_Tesla_Cybertruck_Forge.part11.rar - 234.6 MB
Comments
Add comment
Tags
Archive
| « February 2026 » | ||||||
|---|---|---|---|---|---|---|
| Mon | Tue | Wed | Thu | Fri | Sat | Sun |
| 1 | ||||||
| 2 | 3 | 4 | 5 | 6 | 7 | 8 |
| 9 | 10 | 11 | 12 | 13 | 14 | 15 |
| 16 | 17 | 18 | 19 | 20 | 21 | 22 |
| 23 | 24 | 25 | 26 | 27 | 28 | |
Vote
New Daz3D, Poser stuff
New Books, Magazines
 2022-08-14

 1 441
1 441
 0
0


