Phlearn Pro – Lightroom 101 & 201
 2017-10-13

 2 563
2 563
 0
0
Phlearn Pro – Lightroom 101 & 201
Perfect your photos. From start to finish.
This Lightroom 101 & 201 PRO Bundle is fun, easy, and full of information. If you are interested in workflow, 16 bit editing, copyright, folder structure, importing, exporting, and making your images come to life, this is the perfect tutorial bundle for you!
Importing and Exporting
Lightroom 101 starts off exactly as if we opened the program for the first time — completely empty. Learn how to import your photos into Lightroom to make cataloging and editing easier.
Learn how to create Keyword Presets, Metadata Presets, add Copyright Protection, and convert your RAW files to a more streamlined format. Importing your images into Lightroom correctly will make file organization and image protection easier than ever.
When you complete your editing process in Lightroom it is time to export your photos. Exporting images from Lightroom involves choosing options from color space to image size and even output sharpening. Learn the correct settings for different types of exports and learn how to create presets to save time.
File Structure / Organization / Workflow
Organizing a few photo shoots is simple, but what happens when you have thousands of photos taken over many years? File structure and organization is a very important part of the photography process many people look over.
Learn the same file structure used by professional photographers to save time and headaches. Learn the workflow system we have been developing for years at Phlearn. From import to edit to export, we make sure everything is well organized!
Lightroom 101
Lightroom 101 is designed to familiarize you with all the buttons, commands, and features that Lightroom has to offer. Learn your way around every tool in the Library and Develop Module in Lightroom. Once you have a good understanding of how the program works you will be ready to start editing, that is where Lightroom 201 comes in.
HDR
High Dynamic Range images combine multiple exposures together to display detail in the highlights, mid-tones, and shadows. HDR is a recent addition to Lightroom (v. CC 2014). In this example we composite a portrait into an HDR image, combining multiple techniques for a stunning final photo.
Panorama
A Panorama is made by stitching multiple photos together, making them appear as one large photo. Panoramas are popular with landscape photographers or anyone trying to photograph a large scene. Learn to use Lightroom (V. CC 2014) to combine images into a Panorama.
Create Multiple Versions of Your Images
Take advantage of Virtual Copies in Lightroom to create multiple versions of your images. In this tutorial, we create 4 versions of each image, from black and white to cross processed. The next time you deliver images to your client, try including multiple editing variations. The variations won’t take much time and your client will see them as added value.
Navigate Lightroom Like a Pro
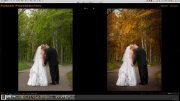
Lightroom 201 will open worlds of editing techniques you can use to make every photo stunning. Follow along as Aaron edits 25 images from start to finish — all in Lightroom. Aaron Nace is known for being a Photoshop Expert and now he brings the same approach to teaching Lightroom!
RAW Files Included
Adobe Photoshop Lightroom is a magical program that allows you to unlock the hidden potential of your images. For best results you needed to work with the original unadulterated files — RAW files. These images are 16bit, whereas a .jpg is only 8bit. In short, you are working with much more information, and with more information comes more power. More info on 8bit vs. 16bit.
Because Lightroom excels in editing 16bit RAW files, that is exactly what we include in this tutorial bundle. The Lightroom 101 & 201 Bundle includes 25 stunning RAW files. Use these images to follow along with the tutorials or practice on your own. Once you download the tutorial bundle they are yours. Just don’t go putting these images in your portfolio – your own images belong there.
Retouching in Lightroom
Photoshop and retouching expert Aaron Nace brings his expertise to a new product — Adobe Lightroom. You will be blown away at how easy retouching in Lightroom can be. In this tutorial we teach you how to look at your image as a whole and retouch globally. Rather than focus on every single pore, we take a more broad approach to retouching.
A person’s body is usually a different color than their face, which tends to appear more red. You will learn how to see differences in skin tone and correct for variation. We offer a simple approach to dodging and burning that gives you complete control without being too technical.
Lightroom CC 2014 now offers the Clone Stamp Tool and the Healing Brush Tool for blemish removal. We show you how to use both tools to remove acne and other skin blemishes, keeping skin texture in tact.
MP4 1280x720 | 7h 15m | ENG | Project Files | 11.9 GB
Download links:

PhlearnProLightroom101and201.part01.rar
PhlearnProLightroom101and201.part02.rar
PhlearnProLightroom101and201.part03.rar
PhlearnProLightroom101and201.part04.rar
PhlearnProLightroom101and201.part05.rar
PhlearnProLightroom101and201.part06.rar
PhlearnProLightroom101and201.part07.rar
PhlearnProLightroom101and201.part08.rar
PhlearnProLightroom101and201.part09.rar
PhlearnProLightroom101and201.part10.rar
PhlearnProLightroom101and201.part11.rar
PhlearnProLightroom101and201.part12.rar
PhlearnProLightroom101and201.part13.rar
Photography/Retouching tuts


Comments
Add comment
Tags
Archive
| « July 2026 » | ||||||
|---|---|---|---|---|---|---|
| Mon | Tue | Wed | Thu | Fri | Sat | Sun |
| 1 | 2 | 3 | 4 | 5 | ||
| 6 | 7 | 8 | 9 | 10 | 11 | 12 |
| 13 | 14 | 15 | 16 | 17 | 18 | 19 |
| 20 | 21 | 22 | 23 | 24 | 25 | 26 |
| 27 | 28 | 29 | 30 | 31 | ||
Vote

New Daz3D, Poser stuff


New Books, Magazines