Skillshare – Trim Sheet Techniques For Video Games
 2021-04-25

 1 886
1 886
 0
0
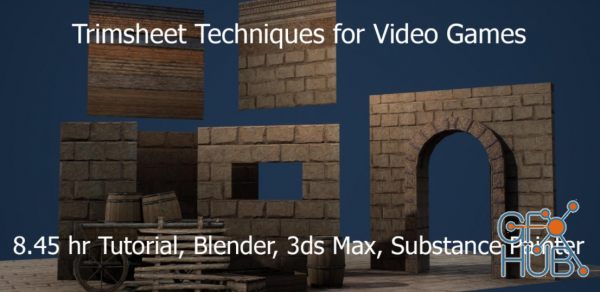
Skillshare – Trim Sheet Techniques For Video Games By Arash Aref
This is a tutorial for creating Trimsheets. We learn a lot of techniques from this one. The tutorial is suitable for beginners and intermediate users who have a bit of 3d understanding. We create 2 seperate trimsheets. one for mostly structural pieces (Stone) and one for props (Wild west).
Hope you find it useful
Below is the list of Chapters included in the tutorials and a quick k description of what we learn in that specefic chapter.
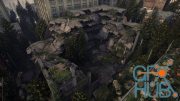
000 _ In this chapter we discover the meaning of Trimsheet and how it could benefit our projects, from optimization all the way to increasing of the quality, compared to the old method of using unique texture for each and every single asset. and we look at the final result of the whole project that we are going to create together.
001 _ It is about time we discuss the importance of "The Planning Stage", and how it is skipped by so many prople. we see how this stage is going to help us along the way and how to start your journey in creating a good plan for your project. We discuss that you should have a clear image of your final creation, no matter it is 3d game environment or anything else, even before starting the creation process. We discover the meaning of "Questions" and "Answers" that will help you for the final Image in your head even before starting your project. Also we talk about the Idea of "Big, Medium, Small' when doigng 3d projects
002 _ In this chapter we talk about Texel Density and how it could help the project and make all of the objects fit together nicely in the environment. we talk about the Texel Density Law and how we could "Bend" this law to our advantage and optimizing the project
003_ We start this chapter by creating the Layout for the trimsheet, we use the planning stage as a guide to creat the layout that fits our purposes. we talk about Idea of Tiling in Trimsheets.
004_ In this chapter we add a bit of detail to the Layout and creating the BIG shapes that are being read from far view.
005_ In this chapter we start adding Medium Details and do some ornament modeling
006 _ In this chapter we custom textures to create the displacement maps in Substance Designer for Ornaments instead of modeling them manully. Then we use the displacement maps in 3ds max to help us shorten the modeling phase for these complex geometrical pieces.
007 _ In this chapter we create the wall profile using the spline modeling method and use some custom displacement maps to create the trim pieces.
008_ This is where we start creating our wooden medium shapes and make them read better in medium distance. by using the references. we use the same techniques as before to create the shapes for our wood Trimsheet
009_ In this chapter we do a basic navigation tutorial in Blender and specially Sculpting mode. and how to prepare the meshes for being sculpted. we go through some helpful brushes and some techniques for adding resolution and optimizing the mesh. We learn how to use alpha bland and White data to help us make our sculpting more realistic. then we import some test meshes and work on them to get a better feeling of sculpting in Blender
010 _ In this chapter we start to sculpt our Stone parts and explore some workflows to make the sculpting process more enjoyable. we use some custom alphas to help us adding more detail to our sculpt and how it is a shortcut to a better result
011 _ In this chapter we export wooden blockout pieces from 3ds Max to Blender and start sculpting using the same techniques that we learned in the previous parts.
012 _ In this chapter we bake the whole sculpts to single planes for texturing in Substance Painter. We do the baking process inside Substance Painter and fix some issues that occur in photoshop. and when the troubleshooting is done we bake the rest of the maps in Substance to help us along the texturing phase
013 _ We start the texturing phase in this part. and explore some techniques to make out texture look more natural and realistic. we texture the Wild West Trimsheet here and learn how to use photo sourced textures to add more realism to our final result.
014 _ Now that we have learned a bit about texturing in Substance Painter, we use those techniques to texture our Stone Trim sheet
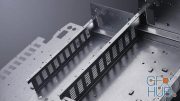
015_ This chapter is where we learn the process of creating meshes inside 3ds Max and explore a lot of different techniques to deal with modeling and Unwrapping our models to make the workflow more enjoyable. We create some assets using different techniques to enhance our knowledge of using trimsheet
Download links:

Trim Sheet Techniques for Video Games.part01.rar
Trim Sheet Techniques for Video Games.part02.rar
Trim Sheet Techniques for Video Games.part03.rar
Trim Sheet Techniques for Video Games.part04.rar
Trim Sheet Techniques for Video Games.part05.rar
Trim Sheet Techniques for Video Games.part06.rar
Trim Sheet Techniques for Video Games.part07.rar
Trim Sheet Techniques for Video Games.part08.rar
Trim Sheet Techniques for Video Games.part09.rar
Trim Sheet Techniques for Video Games.part10.rar
Trim Sheet Techniques for Video Games.part11.rar


Comments
Add comment
Tags
Archive
| « July 2026 » | ||||||
|---|---|---|---|---|---|---|
| Mon | Tue | Wed | Thu | Fri | Sat | Sun |
| 1 | 2 | 3 | 4 | 5 | ||
| 6 | 7 | 8 | 9 | 10 | 11 | 12 |
| 13 | 14 | 15 | 16 | 17 | 18 | 19 |
| 20 | 21 | 22 | 23 | 24 | 25 | 26 |
| 27 | 28 | 29 | 30 | 31 | ||
Vote

New Daz3D, Poser stuff


New Books, Magazines