Udemy – Japanese Alley 3D Game Environment Creation
 2019-02-2

 2 199
2 199
 0
0
Video сourse: Udemy – Japanese Alley 3D Game Environment Creation
What you'll learn
Create an amazing complete game-ready 3D environment
Bake clean maps
Create realistic wet ground
Produce believable dirt, scratches and grime
Learn how to make moist-rain effects on window glass and buildings
Create professional UV maps
Create realistic glow materials
Understand proper scale for creating environments
High poly to low poly baked workflow
Use weighted vertex normals efficiently
Requirements
Basic knowledge of 3ds Max, Unreal, Substance Designer and Painter, Photoshop
Description
Instructor Info
Emiel Sleegers always had love for video games and when he was young, he started using Unity3D for programming but he found himself gravitating more towards the art of making games. Now he is currently working as an environment artist in Ubisoft. He contributed to creating AAA games such as Forza Horizon 3 and The Division 2. His all time favorite game is The Last of Us and that video game is what inspired him to want to work in the game industry. His advice for beginner artists is to focus on one aspect of gaming that they are passionate about, stick to it and get better at it. His hobbies include anything related to games or films, whether it be working on personal projects, freelance work or going out for movies.
Course Info
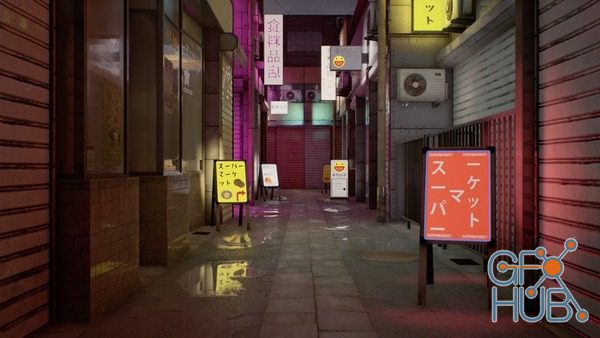
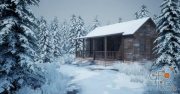
In this course, we will go over the entire process of how to create a Japanese Alley game environment. We will first start out with a blockout of the scene to achieve a proper sense of scale, and once that is done, we will go back to the blockout to 3d modeling the buildings. We will do a high poly to low poly workflow where we will create a high res and low res model and bake normal maps for them. We will go through the process of how to make the environment look realistic, how to use weighted vertex normals, and how to do smart, quick and clean unwrapping of uvs. Then we will jump into Substance Designer to create tilable textures such as metal, concrete, and tarmac. We will touch up on Substance Painter and little bit of Photoshop to texture our props. Once everything is modeled and textured, we will import everything in Unreal to setup our materials and lighting for a nice final render.
Who this course is for:
Anyone who wants to know how to create a game environment
Download links:

Japanese_Alley_3D_Game_Environment_Creation.part01.rar
Japanese_Alley_3D_Game_Environment_Creation.part02.rar
Japanese_Alley_3D_Game_Environment_Creation.part03.rar
Japanese_Alley_3D_Game_Environment_Creation.part04.rar
Japanese_Alley_3D_Game_Environment_Creation.part05.rar
Japanese_Alley_3D_Game_Environment_Creation.part06.rar
Japanese_Alley_3D_Game_Environment_Creation.part07.rar
Japanese_Alley_3D_Game_Environment_Creation.part08.rar
Japanese_Alley_3D_Game_Environment_Creation.part09.rar
Japanese_Alley_3D_Game_Environment_Creation.part10.rar
Japanese_Alley_3D_Game_Environment_Creation.part11.rar
Japanese_Alley_3D_Game_Environment_Creation.part12.rar
Japanese_Alley_3D_Game_Environment_Creation.part13.rar
Japanese_Alley_3D_Game_Environment_Creation.part14.rar
Japanese_Alley_3D_Game_Environment_Creation.part15.rar


Comments
Add comment
Tags
Archive
| « July 2026 » | ||||||
|---|---|---|---|---|---|---|
| Mon | Tue | Wed | Thu | Fri | Sat | Sun |
| 1 | 2 | 3 | 4 | 5 | ||
| 6 | 7 | 8 | 9 | 10 | 11 | 12 |
| 13 | 14 | 15 | 16 | 17 | 18 | 19 |
| 20 | 21 | 22 | 23 | 24 | 25 | 26 |
| 27 | 28 | 29 | 30 | 31 | ||
Vote

New Daz3D, Poser stuff

New Books, Magazines