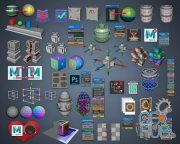
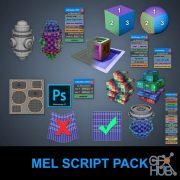
Gumroad – Malcolm341 All Mel Script Pack for Maya
 2020-01-26

 1 788
1 788
 0
0
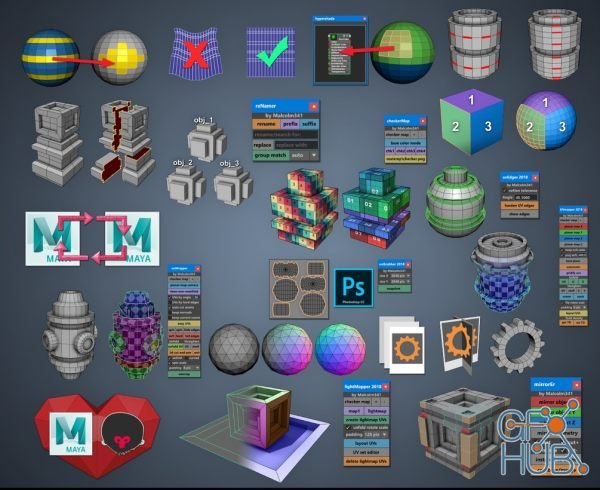
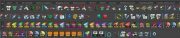
Gumroad – Malcolm341 All Mel Script Pack for Autodesk Maya 2020 (Latest Update)
Gumroad link - http://gumroad.com/malcolm341#cZvxZ
Thanks very much for your support! Each purchase helps maintain the ad free Youtube channel found here http://www.youtube.com/malcolm341
WARNING before using these scripts please install:
For Maya 2018 service pack 6 or later.
For Maya 2017 service pack 5 or later.
-----------------------------------------------------------------------------------------------------------------------------------------------------
How to install:
Close Maya.
Copy the file named shelf_malcolm341_script_pack_2019.mel contained in this .zip file to your desktop.
If you're using Maya 2018 copy the 2018 shelf instead.
If you're using Maya 2017 copy the 2017 shelf instead.
Open Maya.
Click the gear icon in the top left corner of Maya to the left of the shelf and choose load shelf.
Browse to the shelf file you just copied to your desktop and load it.
You should now see a new shelf in Maya with the same name as the file on your desktop.
If you don't see the shelf tabs click the gear icon to the left of the shelf and turn on shelf tabs.
To move the buttons to the shelf of your choice, hold Ctrl + Shift and middle click drag any of the buttons
and drop them on any shelf tab you want to move them to.
-----------------------------------------------------------------------------------------------------------------------------------------------------
If the above install doesn't work for some reason or the shelf loads, but has no buttons on it please ask for help on the Youtube channel or send me a message on Artstation.
Please include the following info when you ask for help:
-What version of Maya you're using.
-What service pack version you have installed.
-Are you on a PC or Mac.
-Is there any error displayed when you load the shelf in the status line at the bottom of the Maya window.
-If you click the unwrap button and see this error // Error: line 3: Cannot find procedure "u3dUnfold".
At the top of Maya click on Windows> Settings/Preferences> Plug-in Manager> search unfold and turn on Unfold3D.mll Loaded and Auto load. The unwrap button should now work.
-----------------------------------------------------------------------------------------------------------------------------------------------------
Marmoset Toolbag workflow:
tbHigh button
Create a group and put your high poly meshes in it, meshes don't need to be combined first, multiple objects is okay.
Select your meshes and press 2 or 3 on the keyboard to activate smooth mesh preview.
Select the group, not the objects, and click the tbHigh button.
Your smooth mesh preview will be converted to polygons behind the scenes without affecting your current models
and the fbx export dialogue will appear.
UV's will be deleted from the exported high poly meshes to speed up export time, your original models in Maya will not be affected.
Name the file and hit export.
tbLow button
Create a group and put your low poly meshes in it, meshes don't need to be combined first, multiple objects is okay.
Select the group, not the objects, and click the tbLow button.
Your meshes will be triangulated behind the scene without affecting your current models
and the fbx export dialogue will appear.
Name the file and hit export.
Import the high and low models into Toolbag and Bake.
If you only have a single high poly or low poly you don't need to put them in a group first and can select the mesh and click the appropriate button.
Youtube video here
http://youtu.be/-B0Lqup3-O0
-----------------------------------------------------------------------------------------------------------------------------------------------------
tbLon button
Create a group and put your low poly meshes in it, meshes don't need to be combined first, multiple objects is okay.
Select the group, not the objects, and click the tbLoN button.
Your meshes will be triangulated, all edges set to soft, all border edges set to hard
behind the scene without affecting your current models and the fbx export dialogue will appear.
Name the file and hit export.
Youtube video here
http://youtu.be/rTk3KpItl_I
-----------------------------------------------------------------------------------------------------------------------------------------------------
uvEdge button:
Click the button to launch the toolbox.
Turn the tick box off if you want to ignore the Angle setting.
Click the harden UV edges to automatically soften all normals then harden UV border edges using the angle tolerence specifed in the Angle field.
Click the show edges button to toggle visability of edges, this can be useful to see how the edge hardness has been set without having to deselct your model.
Youtube video here
http://youtu.be/aNB0Yrd_864
-----------------------------------------------------------------------------------------------------------------------------------------------------
normR button:
Click the button to convert the scene to normal map render mode.
Click the button again to convert the scene back into regular render mode.
If you select some objects first and then click the button those objects will have the normal map render material applied to them automatically.
Normal maps can now be rendered in the top down camera either in the Maya viewport, hardware renderer, or the Maya software renderer.
Youtube video here
http://youtu.be/JuiIcIRyidE
-----------------------------------------------------------------------------------------------------------------------------------------------------
import/export buttons:
Select some objects, click the export button.
The selected objects will be stored on your hard drive as a temp file.
Open a different Maya scene and click the import button.
The selected objects from the previous step will be imported into your currently open scene.
This can be very useful for quickly grabbing just the objects you want and creating a clean scene without doing any manual file management.
You can even have two copies of Maya open at the same time and copy paste between the two by clicking the export button in one Maya
and click the import button in the other Maya.
The temp file will remain until you overwrite it with the next export, even if you close Maya.
If you'd like to change the name or location of the temp file, right one of the buttons and choose edit, then change the below code to point to a new location.
Change C:/matemp/temp.mb to whatever you like.
Repeat for the other button as well or the script won't work.
Youtube video here
http://youtu.be/mydwcKHeFFo
-----------------------------------------------------------------------------------------------------------------------------------------------------
imgRef button:
Select one or more file nodes in the Hypershade and click the imgRef button.
An image reference object is created in the scene for each file node, correct width/height is applied to prevent the texture from skewing.
Reference objects are created facing the Z axis, right click the imgRef button on the shelf and you can choose the X, Y, or XYZ axis as well.
Youtube video here
http://youtu.be/93yN2lFWkTo
-----------------------------------------------------------------------------------------------------------------------------------------------------
miror button:
Click the button on the shelf and it should launch the toolbox.
Click any of the colour coded buttons to mirror in that axis, objects are mirrored from their current pivot points.
Turn on the instace checkbox if you'd like the mirrored object to be an instance.
Turn on the merge verts checkbox if you'd like the mirrored object to be combined and overlapping verts merged.
Select any number of objects and click the instance to object button if you want to de-instance them.
Select any number of objects and click the combine/merge button if you want to combine them and merge overlapping verts.
Click the mirror geometry button if you want to load Maya's default mirror tool.
Youtube video here
http://youtu.be/KWl5iBQVLGU
-----------------------------------------------------------------------------------------------------------------------------------------------------
cmbine, extract, and dupeF buttons:
Click the cmbine the button to combine selected objects, the last selected objects name and pivot point will be used to create the new combined object.
Select some faces and click the extract button, a new object will be created and it's pivot will be centered. The original objects name and pivot will be preserved.
Click the extract button in object mode to separate polygon elements into separate objects, each object will have its pivot centered for convenience.
Combining, extracting, and separating objects won't generate any temp nodes or groups in the outliner so your scene will stay clean as you model.
Combing, extracting, and separating will maintain the objects current hierarchy in the outliner so you won't have to regroup them.
select some faces and click the dupeF button to duplicate the selected faces as new object
Youtube video here
http://youtu.be/_Ou9WC6gjxY
-----------------------------------------------------------------------------------------------------------------------------------------------------
pLoop and pRing buttons:
Select one edge and single click the pRing button to select every other edge ring.
Select one edge and double click the pLoop button to select every other edge loop.
Select more than one adjacent edge and click the pLoop or pRing button to select two edges with a gap of two edges.
The script allows you to select up to eight adjacent edges to create different edge patterns.
Youtube video here
http://youtu.be/6z70-s6REOo
-----------------------------------------------------------------------------------------------------------------------------------------------------
Name button:
Click the Name button to launch the toolbox.
Select some objects.
Type a name into the rename/search for: field
Click rename to rename selected objects with the name you typed.
To add that text as a prefix click the prefix button.
To add that text as a suffix click the suffix button.
To change the increment style select something from the increment drop down and then click rename
To replace part of a name use the top text field to search for, and the buttom text field to replace with. Click the replace button to replace the above text with the below.
To use group name matching put your objects in a group named high or low, select all or some of those objects in those groups and click group match.
Your selection will be renamed to the name you typed and the word _high or _low will be appended to the name based on what group they were in.
This allows you to quickly create name matching for baking in Marmoset Toolbag.
Youtube video here
http://youtu.be/xRYAjetaVjw
-----------------------------------------------------------------------------------------------------------------------------------------------------
copy and paste buttons:
Click a single polygon face and then click the copy shelf button.
The materail assigned to that face is now stored in the clipboard.
Select any object or component and click the paste button, this will paste the material onto the select object or components.
The last material will stay in the clipboard until you copy a new one or close Maya.
If you select an object instead of a face the first material applied to the object will be copied to the clipboard.
Youtube video here
http://youtu.be/BvSg2T2L5Do
-----------------------------------------------------------------------------------------------------------------------------------------------------
matID button:
Select exactly one face.
Click the matID button to select all faces that share the same material as the single face you selected.
Youtube video here
http://youtu.be/6iv728I313s
-----------------------------------------------------------------------------------------------------------------------------------------------------
graph button:
Select one or more faces on a polygon object.
Click the graph button to graph materials assigned to the selected faces.
If the hypershade is not open clicking the graph button will open it, but you'll need to click the button a second time to graph the materials.
Youtube video here
http://youtu.be/BqNJxVBjZyI
-----------------------------------------------------------------------------------------------------------------------------------------------------
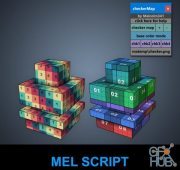
checker button:
Click the button to launch the toolbox.
Click the checker map button to toggle the checker map display on/off. Press the +/- buttons to increase or decrease checker tiling.
Click the base color mode button to toggle base color on/off.
Click the chk1, chk2, chk3, chk4 buttons to procedurally generate four different styles of checker maps.
Click the ..\matemp\checker.png button to open the folder where you can place your own custom checker map texture for the tool to use.
The texture must be named checker.png
The folder path for PC and Mac will be different. On PC C:\matemp\checker.png on Mac /Users/Shared/matemp
Youtube video here
???????????
-----------------------------------------------------------------------------------------------------------------------------------------------------
uvGrab button:
Click the button to launch the toolbox.
Change the X/Y size to what you want.
Select some objects and click the snapshot button, the UVs for those objects will be opened in Maya's currently assigned image editing program. By default this is fcheck.
To change which program opens the UVs, I like them to open in Photoshop go to:
Windows> Settings/Preferences> Applications> Image Editing Applications, then under image editor browse to which program you want to use
For pro users if you right click the uvGrab button there are shortcuts for common snapshot sizes so you don't need to bother opening the toolbox.
Youtube video here
http://youtu.be/wFpu3WfVSBw
-----------------------------------------------------------------------------------------------------------------------------------------------------
LMap button:
Click the button to launch the toolbox.
Click the checker map button to turn on/off the checker map, press the plus or minus button to increase or decrease the checker map size.
Click map1 to switch all selected objects to UV map1.
Click lightmap to switch all selected objects to UV map lightmap if it exists.
Click create lightmap UVs to copy map1 into a second UV set and rename it to lightmap.
Turn off unfold lightmaps tick box if you don't want the lightmap UVs to be created using unfolding.
The padding drop down controls how much padding is used when creating the lightmap UVs and when using the layout UVs button.
Click layout UVs to layout UVs.
Click UV set editor to launch Maya's UV set editor.
Click delete lightmap UVs to delete lightmap UVs on selected objects.
Youtube video here
http://youtu.be/pKQWrHBgx2E
-----------------------------------------------------------------------------------------------------------------------------------------------------
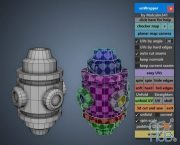
unwrap button:
Click the button to launch the toolbox.
Click the checker map button to turn on/off the checker map, press the plus or minus button to increase or decrease the checker map size.
Click the planar map camra button apply a planar camera projection.
Click the 3d cut and sew button to enter the 3D cut and sew tool and enable the checker map.
Click the unwrap button to unwrap the mesh automatically and layout UVs, remember after pressing the unwrap button once you can now press the g key on the keyboard
to unwrap the mesh again and again each time you make a new edit while using the 3d cut and sew tool. This saves a lot of time.
Youtube videos here
http://youtu.be/cy1vqLw-agk
http://youtu.be/6tYpY3kVLn8
-----------------------------------------------------------------------------------------------------------------------------------------------------
gridUV and recUV buttons:
Select some faces and click the gridUV button, the selected faces will be sewn together into a grid of uniform squares.
The script only works on quads, if you have some tris selected it will work, but produce unexpected results.
Long strips of faces can be selected to map them into a UV strip.
If your model has no geometry seams, for example a cylinder, you can enter multi component mode and select some edges to use as the UV border edge.
Then hold shift and select the faces you want to gridify and run the script.
After running the script if the UV shell is rotated the wrong way, simply click the button a second time to rotate it by 90 degrees.
The rectUV button does the exact same thing, but it also applies a unfold and straighten to the UVs so you get a grid of rectangles with correct aspect ratio instead of uniform squares.
Youtube videos here
http://youtu.be/FgHXfghUx5Y
http://youtu.be/QkeXYPz-Z9g
-----------------------------------------------------------------------------------------------------------------------------------------------------
uvMap button:
Click the button to launch the toolbox.
Click the checker map button to turn on/off the checker map, press the plus or minus button to increase or decrease the checker map size.
Click any of the colour coded buttons to apply different types of planar maps or automatic mapping to your selection.
If the proj w/h checkbox is on the number you type in this field will be used to automatically set the projection to that specific texel density.
For example, 400 means 400 units in Maya. So if you have a 2048x2048 texture applied to your model and planar map with the value set to 400 you'll get 2048 pixels = 400 units in Maya.
If you're unfamiliar with how texel density works please watch this video http://youtu.be/5e6zvJqVqlA
If proj w/h checkbox is off and keep w/h ratio checkbox is on the planar mapping will be applied in the 0-1 UV space without stretching.
If proj w/h checkbox is off and keep w/h ratio checkbox is also off the planar mapping will be appliked in the 0-1 UV space and the UVs will be streted into a square.
To gridify UVs, select some polygon faces and click the gridify UVs button, note that if your model has no geometry border edges gridify UVs will sew the UVs onto themselves.
To prevent this from happening for example on a cylinder, you can enter multi component mode and select some edges as the UV border edge to cut on and then shift select the faces and then click the button.
A video of how to do this can be found here
http://youtu.be/FgHXfghUx5Y
http://youtu.be/QkeXYPz-Z9g
The Unfold section has buttons for unfolding along UV, U only, or V only.
The Straighten section has buttons for straightening UVs along U and V, U only, or V only. The straighten Shell button requires one edge to be selected first.
The orient button will orient UV shells to a selected edge.
The stack shells button will work in any component mode and only requires you to select part of two or more UV shells to work.
The layout UVs button will layout UVs without any rotation, it will also scale all UV shells to be the same texel density.
Padding for UV shells is determined using the padding drop down menu.
The unfold layout UVs tick box can be enabled if you want the layout UVs to also unfold your UVs at the same time.
The copy TD button will capture the current texel density from a selected face, and the paste TD button will paste that texel density onto selected UVs, objects, or faces.
Youtube videos here
http://youtu.be/xWLcVflYANg
http://youtu.be/KTxT8o2Rm9A
Download links:

Comments
Add comment

New Daz3D, Poser stuff

New Books, Magazines